Thursday 18 October 2018

Microsoft PowerApps: How to create environments in PowerApps

Environments in PowerApps

An environment is a space to store, manage, and share your organization’s business data, apps, and flows. 


In PowerApps admin center, you can create a new environment or manage all of the environments that you have created. To access the PowerApps admin center go to admin.powerapps.com, or go to PowerApps site, click Settings and select Admin Center.


Creating a new environment

1. Click New Environment.


2. Enter Test environment, select your Region, and Environment type of Trial. Click Create environment.


3. Click Create database. Select your Currency and Language. Mark Include sample apps and data and click Create database.


Once you have created the environment you can find in the list available in the PowerApps portal. 


Tuesday 16 October 2018

Microsoft PowerApps: How to share a PowerApps

Prerequisites
Learn how to create PowerApps: How to create an App in PowerApps
Once you are done developing your PowerApp you can now share the App with all the users in the organization or just add specific users and grant permissions.


NOTE: You can't share apps with a distribution group in your organization or with any users or groups outside your organization.

Microsoft PowerApps: How to create an App in PowerApps (Part 2)

In this part of blog, we are now going to create our first app using Microsoft PowerApps service that will be consuming data from a Dynamics 365 for Operations for which we have already created our data connection in Part 1.

Go to Apps -> Create an app


You will see there are multiple options available to start creating your App. Here you can select the layout template and data source for your app or you can choose blank app template and build it all from scratch.


PowerApps generates three-screen app BrowseScreen1, DetailScreen1 and EditScreen1 based on the records.


You can now customize the screens by modifying or adding more controls or change the data source as well.

Change the Data source:


Modify the layout:


Modify the text field:


Sort the records:


Controls: You can use variety of Controls in your applications


Preview the App:

You can preview the app by clicking the run button.


When you are done developing your PowerApp, click File and then click Save


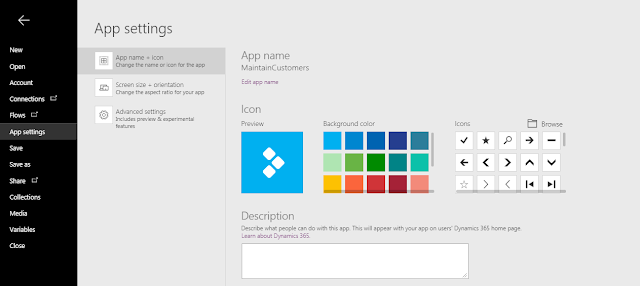
Go to App settings to add description or configure elements.


You can now see your newly created app in the App menu.


Learn how to share PowerApps in the next blog: How to share PowerApps

Microsoft PowerApps: How to create an App in PowerApps (Part 1)

In this blog we will learn how to create an app using Microsoft PowerApps. Before we get started let’s find out what are PowerApps?

Introduction to PowerApps

Microsoft PowerApps is a service that lets you build business apps that run in a browser or on a phone or tablet, and no coding experience is required.


Connectors

PowerApps supply a wide area of data sources to connect to.Connectors provide connectivity for many popular services and on-premises data sources including Microsoft SharePoint, Microsoft Office 365, Google Drive, OneDrive, SQL Server, Salesforce, Dynamics AX, Dynamics CRM and many more.


How PowerApps works?


Start creating a PowerApp

To create an App you first Sign in to PowerApps studio web.powerapps.com


First of all we need to add data source connection

Here we are going to create connection with Microsoft dynamics 365 for Finance and Operations.

Go to Data -> Connections -> New connections


From the list select Dynamics 365 for Operations. In the dialog box click Create and sign in with your account. You will see that the connection will be added in your connection list. In the same way you can connect with the different data sources.


We will learn how to create an App in the second part of this post : How to create an App in PowerApps (Part 2)


Friday 12 October 2018

Passing values between pre and post event handlers in D365FO / AX 7

Here is the sample code to pass / store values between pre and post event handlers using args. You can set the value in pre-event handler using args.addArg and get the value in post handler args.getArg.


    /// <summary>
    /// enforcePayRateTolerance pre event handler
    /// </summary>
    /// <param name="args">Event args</param>
    [PreHandlerFor(tableStr(HRMCompFixedPlanTable), tableMethodStr(HRMCompFixedPlanTable, enforcePayRateTolerance))]
    public static void HRMCompFixedPlanTable_Pre_enforcePayRateTolerance(XppPrePostArgs args)
    {
        HRMCompFixedPlanTable HRMCompFixedPlanTable = args.getThis();

        args.addArg("Tolerance", HRMCompFixedPlanTable.Tolerance);

        HRMCompFixedPlanTable.Tolerance = HRMCompTolerance::None;
    }

    /// <summary>
    /// enforcePayRateTolerance post event handler
    /// </summary>
    /// <param name="args">Event args</param>
    [PostHandlerFor(tableStr(HRMCompFixedPlanTable), tableMethodStr(HRMCompFixedPlanTable, enforcePayRateTolerance))]
    public static void HRMCompFixedPlanTable_Post_enforcePayRateTolerance(XppPrePostArgs args)
    {
        HRMCompFixedPlanTable HRMCompFixedPlanTable = args.getThis();
        HRMCompTolerance tolerance;

        if (args.existsArg("Tolerance"))
        {
            tolerance = args.getArg("Tolerance");

            HRMCompFixedPlanTable.Tolerance = tolerance;
        }
    }

Friday 14 September 2018

Changing report design based on parameter value in X++ in AX

First, you need to create a controller class and override its preRunModifyContract() method. This method is commonly used for Modifying the query or setting the contract values that are hidden from the user on the dialog. Below is the sample code  

/// <summary>
///    The <c>HRKPIStatusReportController</c> class is the controller class for the <c>HRKPIStatusReport</c>
///    SRS report.
/// </summary>
class HRKPIStatusReportController extends SrsReportRunController
{

    public static void main(Args _args)
    {
        HRKPIStatusReportController controller = new HRKPIStatusReportController();
        controller.parmReportName(ssrsReportStr(HRKPIStatusReport, Summary));
        controller.parmArgs(_args);
        controller.startOperation();
    }

    protected void preRunModifyContract()
    {
        HRKPIStatusReportContract contract = this.parmReportContract().parmRdpContract() as HRKPIStatusReportContract;
       
        this.parmReportContract().parmReportName(this.getReportName(contract));
       
        super();
    }

    private str getReportName(HRKPIStatusReportContract _contract)
    {
        str reportNameLocal;

        if (_contract.parmReportDesign() == HRReportDesign::SummaryView)
        {
            reportNameLocal = ssrsReportStr(HRKPIStatusReport, Summary);
        }
        else
        {           
            reportNameLocal = ssrsReportStr(HRKPIStatusReport, Detail);
        }

        return reportNameLocal;
    }

}

Friday 3 August 2018

Import and Export project with multiple objects using VS - D365FO / AX 7

Overview
In Visual Studio we have solution that contains multiple projects. These projects helps us to organize and manage the elements. Each project contain elements from only one model. In order to move elements from one environment to another in D365, It can be easily done by using project package file which contains list of the elements added in the project.

To transfer the elements first create a project in VS and add elements to the project and follow the steps.

Export a project
Exporting a project is quite simple. You need to Right-click it and select Export Project. Provide the name of the project file and click Save. Project file is created with extension .axpp.


Import a project
Now, you can use this file to move the elements into any environment by just simply importing the project. 

Go to Visual Studio and click on Dynamics 365 -> Import Project. Now select the .axpp file you need to import. By default all the elements in the project are selected for import. After selecting the elements click OK. 


NOTE: Project package file doesn’t only carries the elements but also contains the information about the model and the layer they belongs to. So during import if the model doesn’t exists Visual Studio creates the missing model automatically.

Wednesday 1 August 2018

Deploy SSRS reports using PowerShell D365 / AX 7

Open Windows PowerShell as administrator and run below command.

Deploy all reports

C:\AOSService\PackagesLocalDirectory\Plugins\AxReportVmRoleStartupTask\DeployAllReportsToSSRS.ps1


Deploy specific report

C:\AosService\PackagesLocalDirectory\Plugins\AxReportVmRoleStartupTask\DeployAllReportsToSSRS.ps1 -Module ModuleName -ReportName ReportName.Report

Monday 30 July 2018

Creating custom financial dimension Lookup using X++ code in AX / D365FO / AX 7


Here is the sample X++ code to create custom financial dimension lookup

public void Lookup(FormStringControl _control)
{
        DimensionAttribute                  dimensionAttribute;
        DimensionAttributeDirCategory       dimAttributeDirCategory;
        Query                               query = new Query();
        SysTableLookup                      sysTableLookup;

        dimensionAttribute = DimensionAttribute::findByName('ServiceLine');

        if (dimensionAttribute.Type == DimensionAttributeType::CustomList)

        {

        select firstonly DirCategory from dimAttributeDirCategory
            where dimAttributeDirCategory.DimensionAttribute == dimensionAttribute.RecId;

        sysTableLookup = SysTableLookup::newParameters(tableNum(DimensionFinancialTag), _control);

        sysTableLookup.addLookupfield(fieldNum(DimensionFinancialTag, Value));
        sysTableLookup.addLookupfield(fieldNum(DimensionFinancialTag, Description));

        query = new Query();
        query.addDataSource(tableNum(DimensionFinancialTag)).

        addRange(fieldNum(DimensionFinancialTag, FinancialTagCategory)).

        value(queryValue(dimAttributeDirCategory.DirCategory));

        sysTableLookup.parmQuery(query);

        // Perform the lookup.
        sysTableLookup.performFormLookup();

       }
}


Difference Between Edit And Display Method in Ax

Display Method: The display method means that the method’s return value is being displayed on a form or a report.  This value is fixed and c...